Processing Ribo-Seq Data with RiboGalaxy for RiboSeq.org
![]()
About RiboSeq.org
Riboseq.org is an online gateway to a set of integrated resources for the processing and analysis of ribosome profiling (Ribo-Seq) data. Currently these are GWIPS-viz, Trips-Viz and RiboGalaxy.
We recommend users process their Ribo-Seq data using RiboGalaxy and then upload their data to Trips-Viz for downstream analysis.
GWIPS-viz enables users to visualize Ribo-Seq and RNA-Seq data aligned to the genomes of 29 organisms along with auxiliary information such as reference annotations. Currently, pre-processed datasets from over 200 publicly available ribosome profiling studies are made available to users for visualization and download. GWIPS-Viz also supports the creation of user generated custom tracks for private data visualization.
Trips-Viz enables visualization of public and private Ribo-Seq, RNA-seq and MassSpec data aligned to the transcriptomes2. It also enables a range of functionalities for the analysis of ribosome profiling data including footprints length distribution and periodicity, metagene profiles, differential expression, detection of translated ORFs and many more.
RiboGalaxy is a Galaxy based platform tailored for the online processing of ribosome profiling data. The intuitive galaxy interface enables users who lack scripting skills or sufficient computational resources to process their data. A wide variety of reference sequences are supplied to streamline users’ data processing workflows. RiboGalaxy simplifies Ribo-Seq data processing for upload to GWIPS-viz and Trips-Viz.
Galaxy Basics

This is the basic Galaxy user interface that you may be familiar with from other Galaxy instances. If not, the most important features are highlighted here.
Login/Register
We strongly advise that all users create an account and login prior to carrying out any data processing or analysis. This ensures that information about your analysis is associated with your account and can be accessed from any browser. If you forget to login then there is nothing we can do to help you retrace your steps!

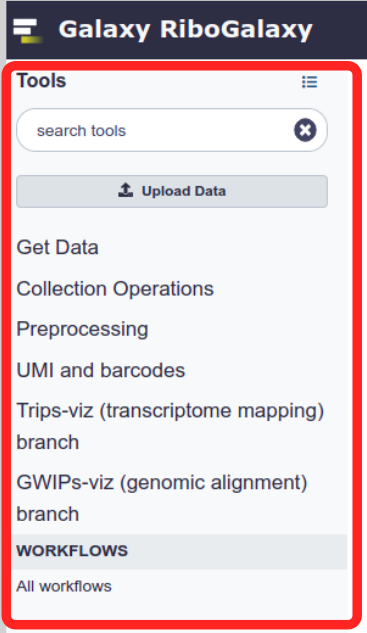
Tool Panel
The tool panel on the left hand side is where you will find the RiboGalaxy supported data processing tools. Within this panel tools are grouped into the data processing stages that they are generally used for. However, we will see later on where some tools can be used in other steps also.
Clicking on the tool name will load a new page where you can input you parameters prior to running the tool.
History
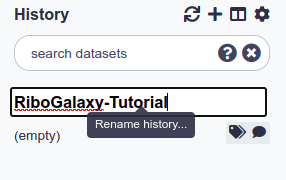
Your data processing and analysis history is stored on the panel to the right. Here we can see the output files produced by the jobs we run and based on their colour see how successful that job was. A green output file suggests the process was sucessful. Red suggests un-successful. Yellow means the process is running and grey means it is yet to be run.
All of the metadata about the job that was run to produce each output can be accessed by clicking on that output. You can also visualise and download the data using various buttons on that panel.

It is always good to create a new history for each general data processing task and to rename it to reflect its purpose.
Getting Data
Galaxy offers a number of ways of getting data onto the platform. You can export data straight from the UCSC table browser, NCBI Genomes Database or the ENA.
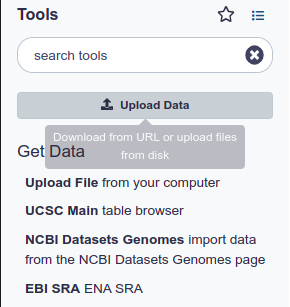
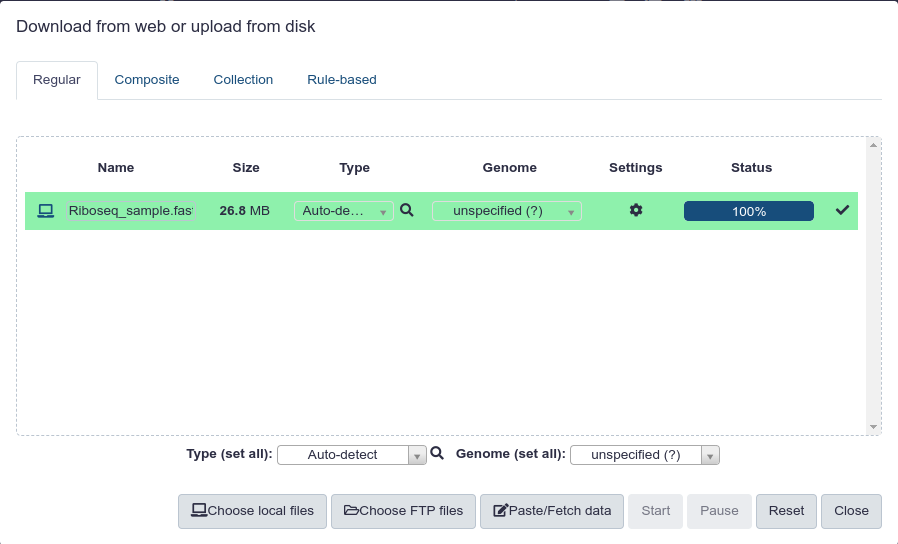
For the purpose of this tutorial we will assume we start off with FASTQ file from one of our own experiments that we will need to upload from our local computer. We will use a sample yeast dataset that can be found here.
Once you click on ‘Upload File’ you are presented with the following screen.

You can upload files in a number of ways. Once you have it uploaded your screen should look like this:
Once the file is uploaded the first step is to check the quality of the sequenicng data. We will do this in the preprocessing step using FastQC.
Preprocessing
FastQC
Select FastQC from the preprocessing tools list in the tools panel. Select your uploaded Ribo-Seq FASTQ as your input and leaving all other parameters as default, hit execute.
It is worthwhile learning more about FastQC from their own documentation: FastQC.
Once the outputs turn green in the history panel the job is completed. Open the HTML report by downloading the Webpage output and opening it in a browser.
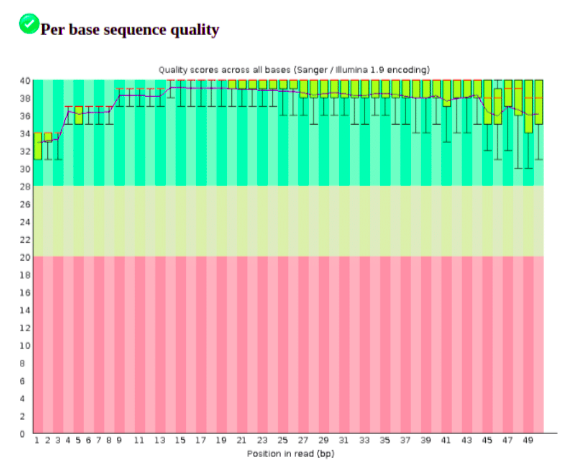
Looking at the per base sequence quality report we can see that our sample dataset is of high quality.
The per base sequence content is flagged as failed by FastQC. To be aware, however, that the 3’ end of the sequence reads have the adapter sequence which we will remove. The presence of sequencing adapters or barcodes that have not been trimmed will often lead to this test failing.
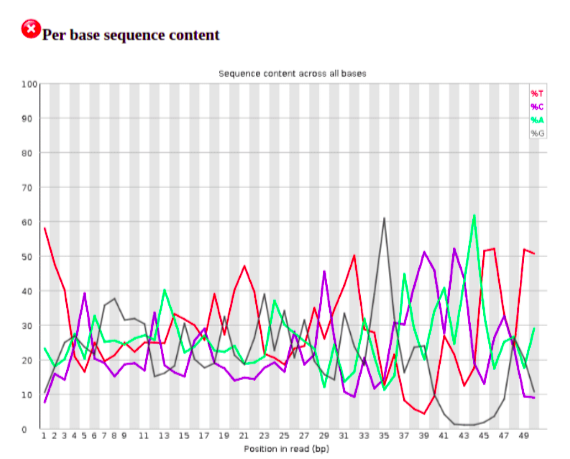
The first number of bases are overrepresented by ‘T’ likely originating from untemplated additions. One option is to remove the first 3 bases using the Trim sequences tool from the Pre-processing tools list. As this is a small sample of a much larger FASTQ file, for the purpose of this training session we will leave as is. However, it is always worth checking for untemplated additions. Likewise, after adapter removal, it can be useful to re-run FastQC on the trimmed FASTQ file.
The overrepresented sequences report shows over representation of the adapter sequence that we are yet to remove. If sequences that show up in this report do not correspond to the adapter then it can be useful to blast the overrepresented sequences to check for contamimation
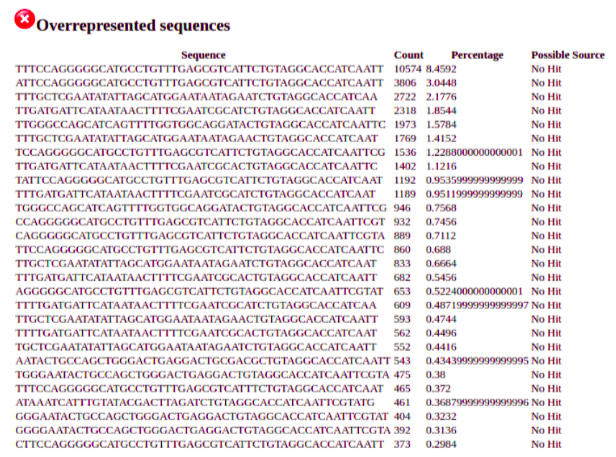
We will need to remove the following adapter from the 3’ ends of our reads: CTGTAGGCACCATCAAT.
Adapters and Barcodes
In RiboGalaxy we use Cutadapt for adapter removal and barcode splitting. We do not require barcode splitting in the case of our small sample file, however, I will still demonstrate how we would set up the tool if we did need to split the fastq based on barcodes.
Cutadapt for Adapter Removal
In the case of our sample file we have seen that the presence of a CTGTAGGCACCATCAAT adapter at the 3’ end of each read caused FastQCs overrepresented sequeunces test to fail. We can remove this adapter using cutadapt.

- Select the cutadapt tool from the tools panel under the preprocessing section.
- Under the ‘FASTQ/A file’ section choose your uploaded file (eg. Riboseq_sample.fastq)
- In this case we choose “Insert 3’ (End) Adapter”
- In the dropdown menu that is produced, pick ‘Enter Custom Sequence’ from Source
- Give the adapter a name
- Enter the adapter sequence (in our case: CTGTAGGCACCATCAAT)
Then hit Execute leaving all other parameters as default.
Cutadapt for Barcode Splitting
Although we do no need to demultiplex on Barcodes for this sample, cutadapt does support this functionality too.
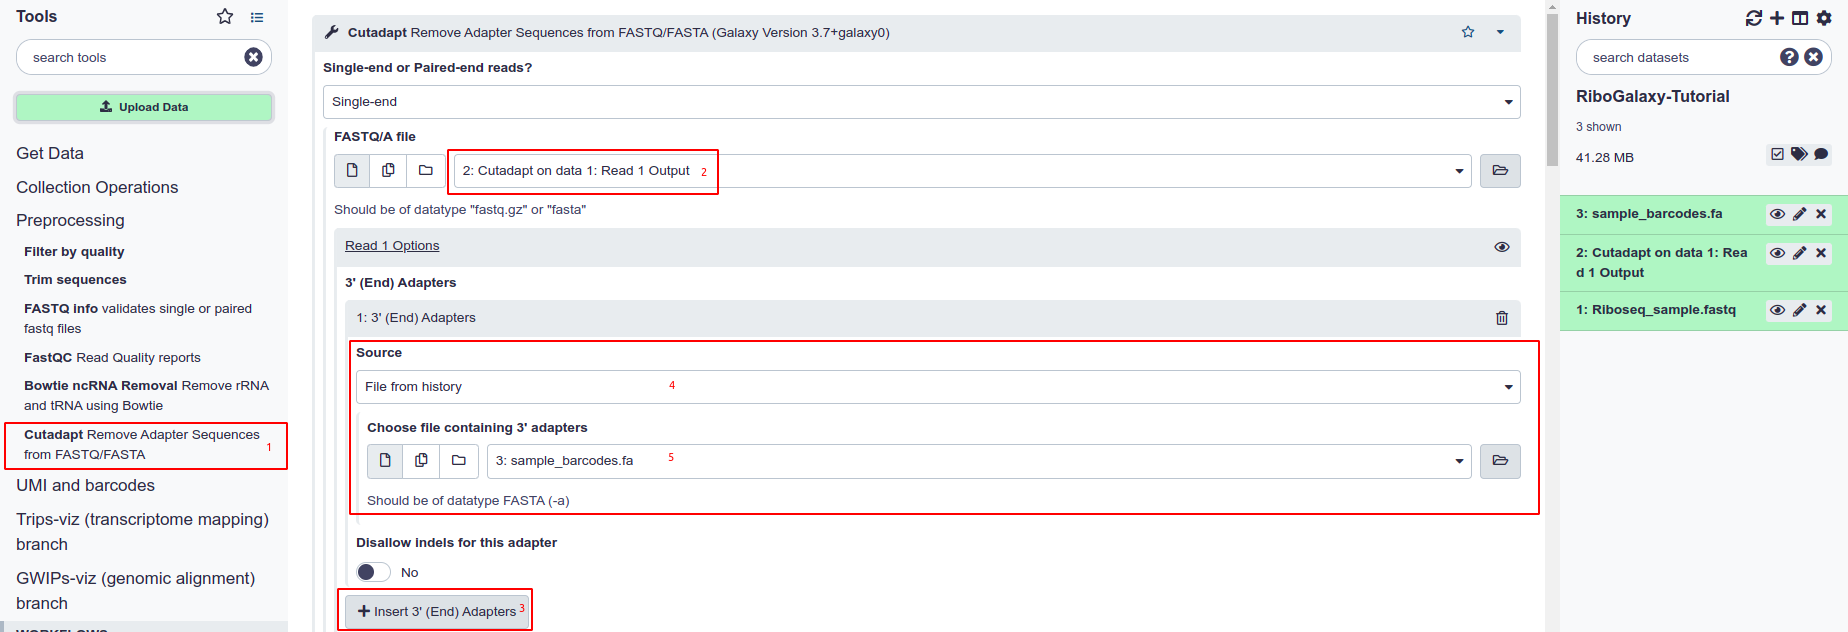
- Select the cutadapt tool from the tools panel under the preprocessing section.
- Under the ‘FASTQ/A file’ section choose your uploaded file (eg. Riboseq_sample.fastq)
- In this case we choose “Insert 3’ (End) Adapter”
- In the dropdown menu that is produced, pick ‘File from history’ from Source.
- Then under ‘Choose file containing 3’ adapters’ pick a FASTA file that you have uploaded containing the barcodes.
There is more information on this barcode fasta file in the cutadapt documentation
Finally, prior to hitting Execute there is one more step. In the ‘Outputs selector’ we must select ‘Multiple output: create a separate file for each adapter trimmed (default: all trimmed reads are in a single file)’.

Then we can execute.
UMI processing
RiboGalaxy currently supports moving UMIs (unique molecular identifiers) from reads to read headers for the McGlincy & Ingolia protocol only. This is done using the Move UMIs from Reads to Header tool. This tool takes one input and produces one output fastq file.

- Select ‘Move UMIs from Reads to Header’ from the ‘UMI and barcodes’ section
- Choose the fastq file that you wish to process
- Hit execute.
Removal of non coding RNA
In ribosome profiling data analysis we are only interested in processing true ribosome protected fragments. As a result, we align all remaining reads to the rRNA and tRNA of our organism prior to Genome/Transcriptome Alignment. On RiboGalaxy we do this using Bowtie.
RiboGalaxy provides users with a selection of commonly used rRNA and tRNA indices that can be used to speed up this step. However, in the case where your organism of interest is not supported you can upload a FASTA file and bowtie/RiboGalaxy will index it for you!

- Select Bowtie ncRNA Removal from the tool panel
- Choose to use a built-in index
- Select the index you want to use from the ‘Select a reference index’ drop down list
- Choose the FASTQ file you want ot align. Normally this will be the FASTQ with adapters removed.
- Choosing Full Paramter list under ‘Bowtie Settings’ allows you to customise alignment parameters although the defaults are set up for ncRNA removal.
This marks the end of the preprocessing steps. The reads should now be ready for alignment to the genome/transcriptome.
Read Alignment
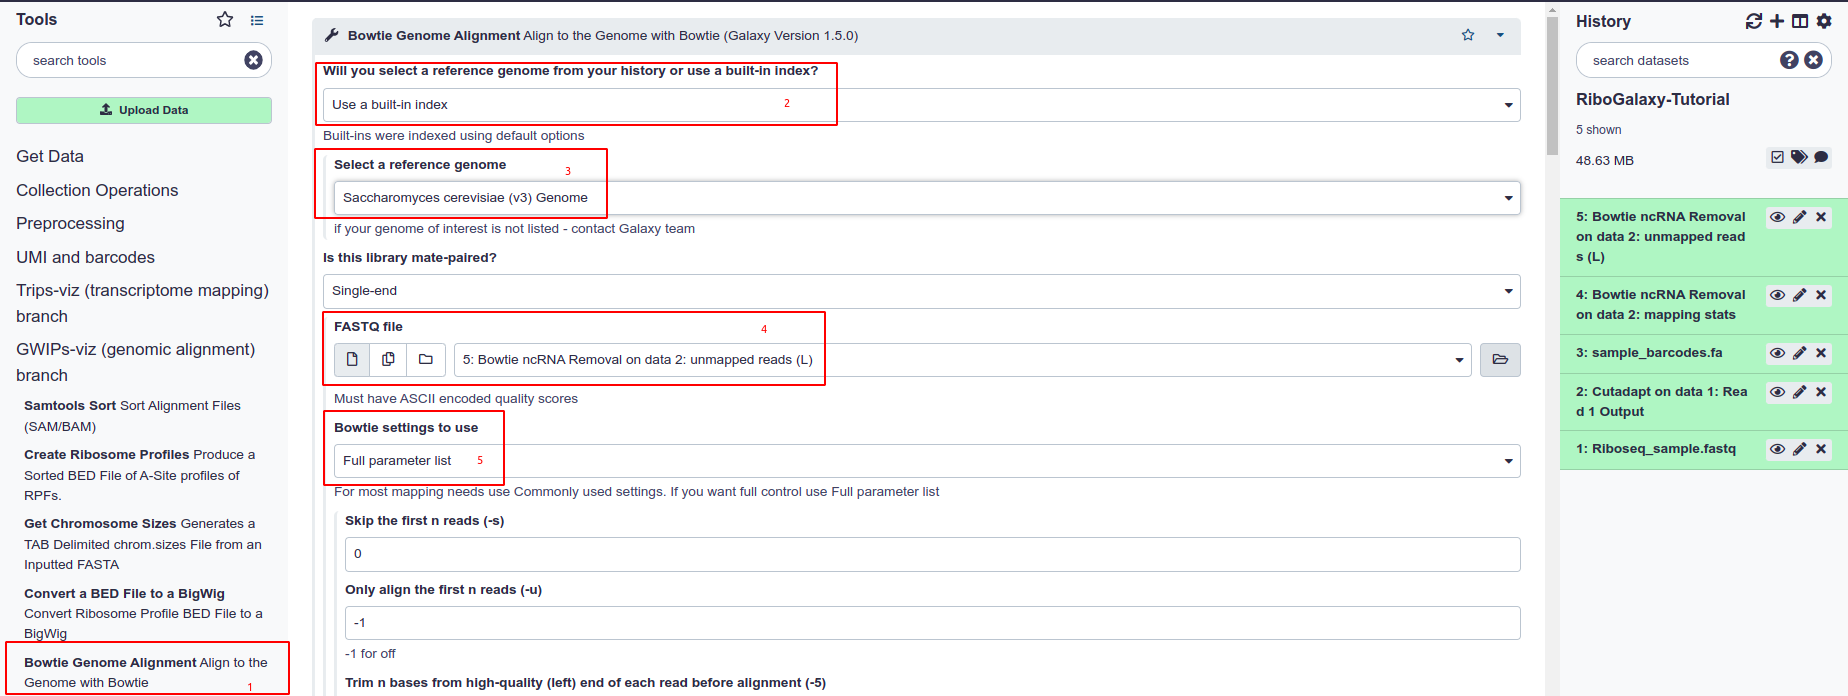
Whether we are aligning to the Genome or the Transcriptome on RiboGalaxy we use Bowtie. The alignment parameters vary depending on the reference type so on RiboGalaxy we split these two similar processes into individual tools that differ by the built in indexes that are available and the default paramaters that are selected.
The process of using these tools is identical to that above when removing ncRNA. The screenshots below visually describe these processes.
Genome Alignment
If you would like to visualise your alignments on the genome browser GWIPS-Viz then you must first align to the Genome reference.
Transcriptome Alignment
If a user wishes to visualise and further analyse their Ribo-Seq data on Trips-Viz they must first align to a supported transcriptome reference.

Alignment Processing Prior to Upload
Some of the following steps are common across Ribo-Seq data processing pipelines. However some choices have been made to conform to the inteded destination resources GWIPS-Viz and Trips-Viz.
GWIPS-Viz
In order to visualise a dataset of GWIPS-Viz we must create a bigWig file of the ribosome profiles and host it somewhere accessible on the internet such as a FTP server.
To create a BigWig file from the BAM file produced in the Genome Aignment step we carry out the following steps.
Sort the BAM file
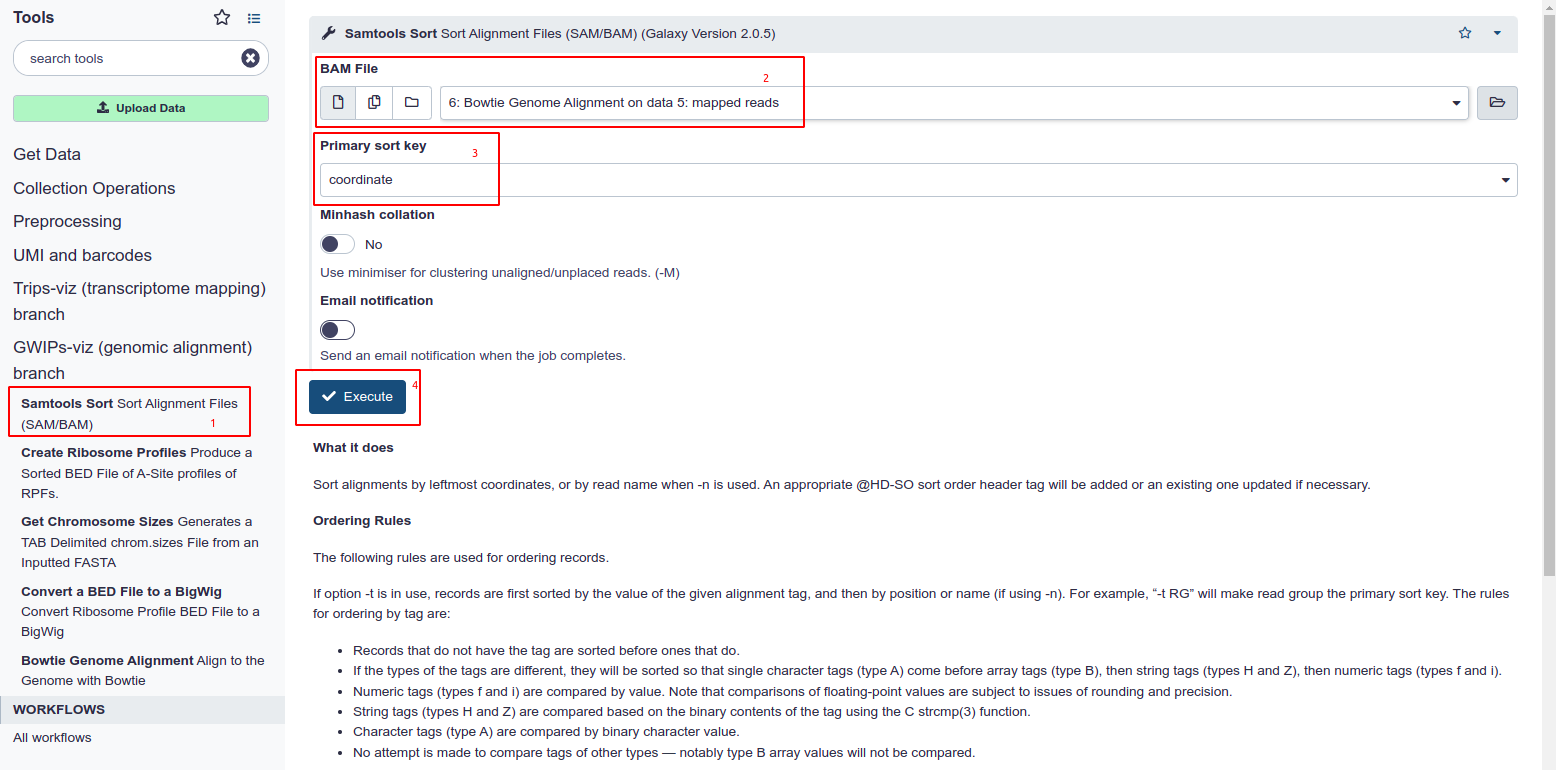
- Choose Samtools Sort from the tool panel in the section under GWIPS-Viz.
- Select the Genome aligned BAM file from your history.
- Ensure ‘Coordinate’ is selected as the primary sort key. This is set as default and is the primary differentiator between this tool and the one under the Trips-Viz section
- Hit Execute
Create a Ribosome Profile
The BAM file is now ready to be converted to a Ribosome Profile.
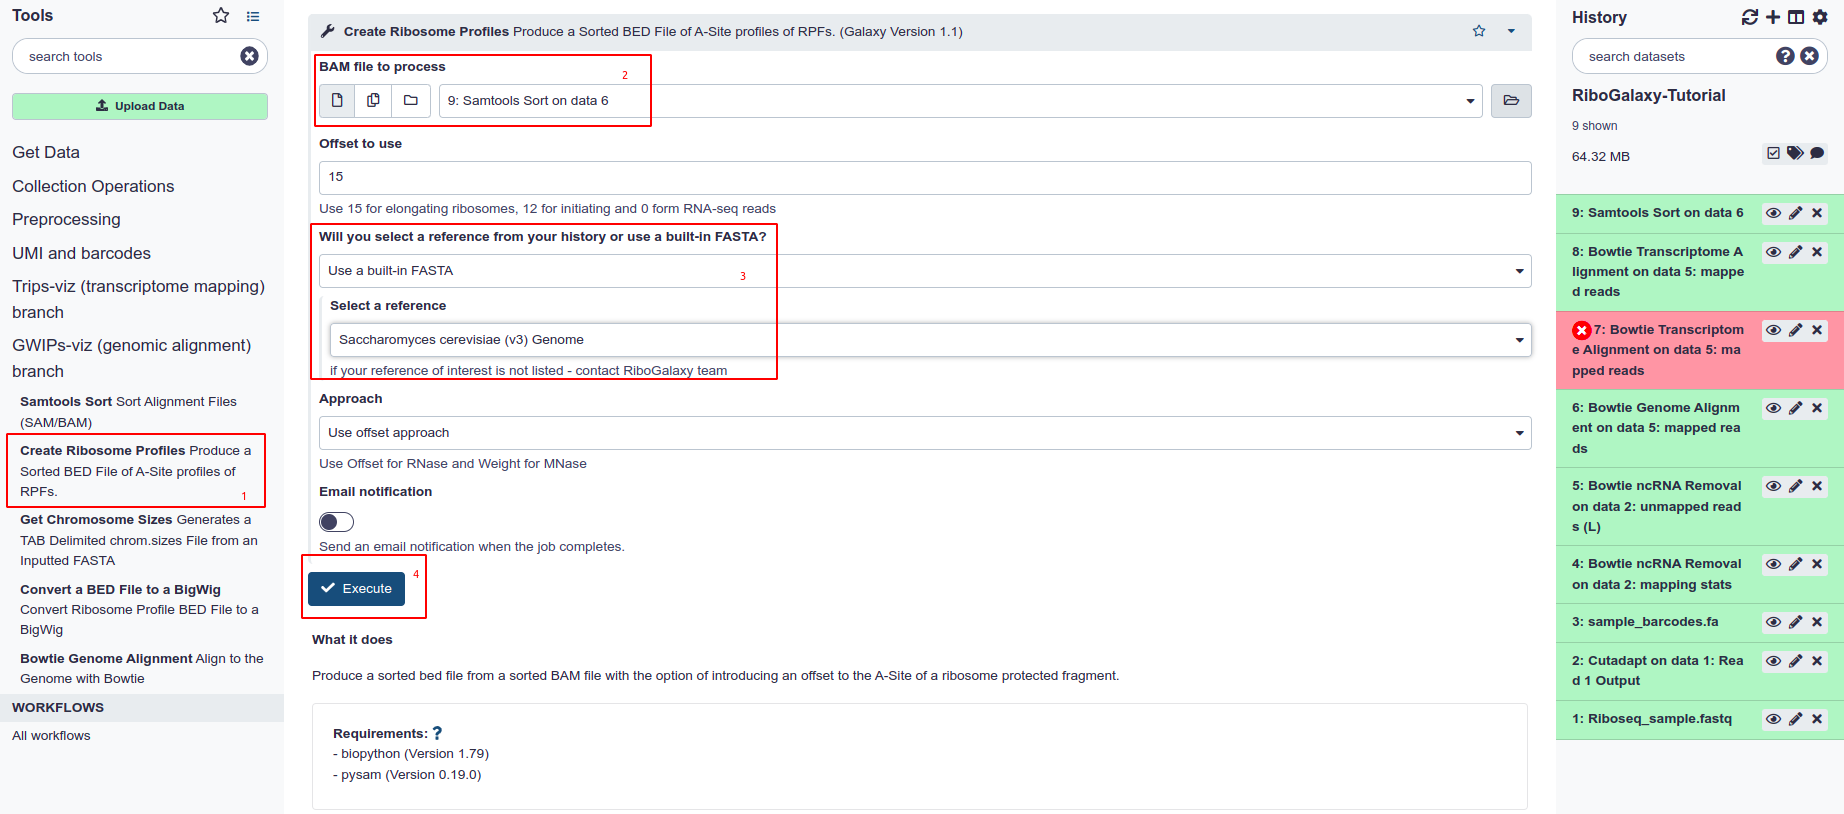
- Select Create Ribosome Profiles from the tool panel under GWIPS-Viz
- Under Bam File to Process select the coordinate-sorted BAM file
- Ensure you have the same reference to which you previously aligned your sample selected.
- Hit Execute.
The other paramaters in this tool allow have little help guides underneath to explin when to use each parameter.
When processing elongating ribosomes we use a set offset of 15 bases. For initiating ribosomes we use an offset of 12.
When using RNase digested reads we use the Offset approach. If the reads are digested with MNase then a weight centered approach is advised.
Convert a Ribosome Profile to a bigWig
Finally, we can convert our profile to the desired bigWig file. However, first we must create a chromosome sizes file for our genome of interest.
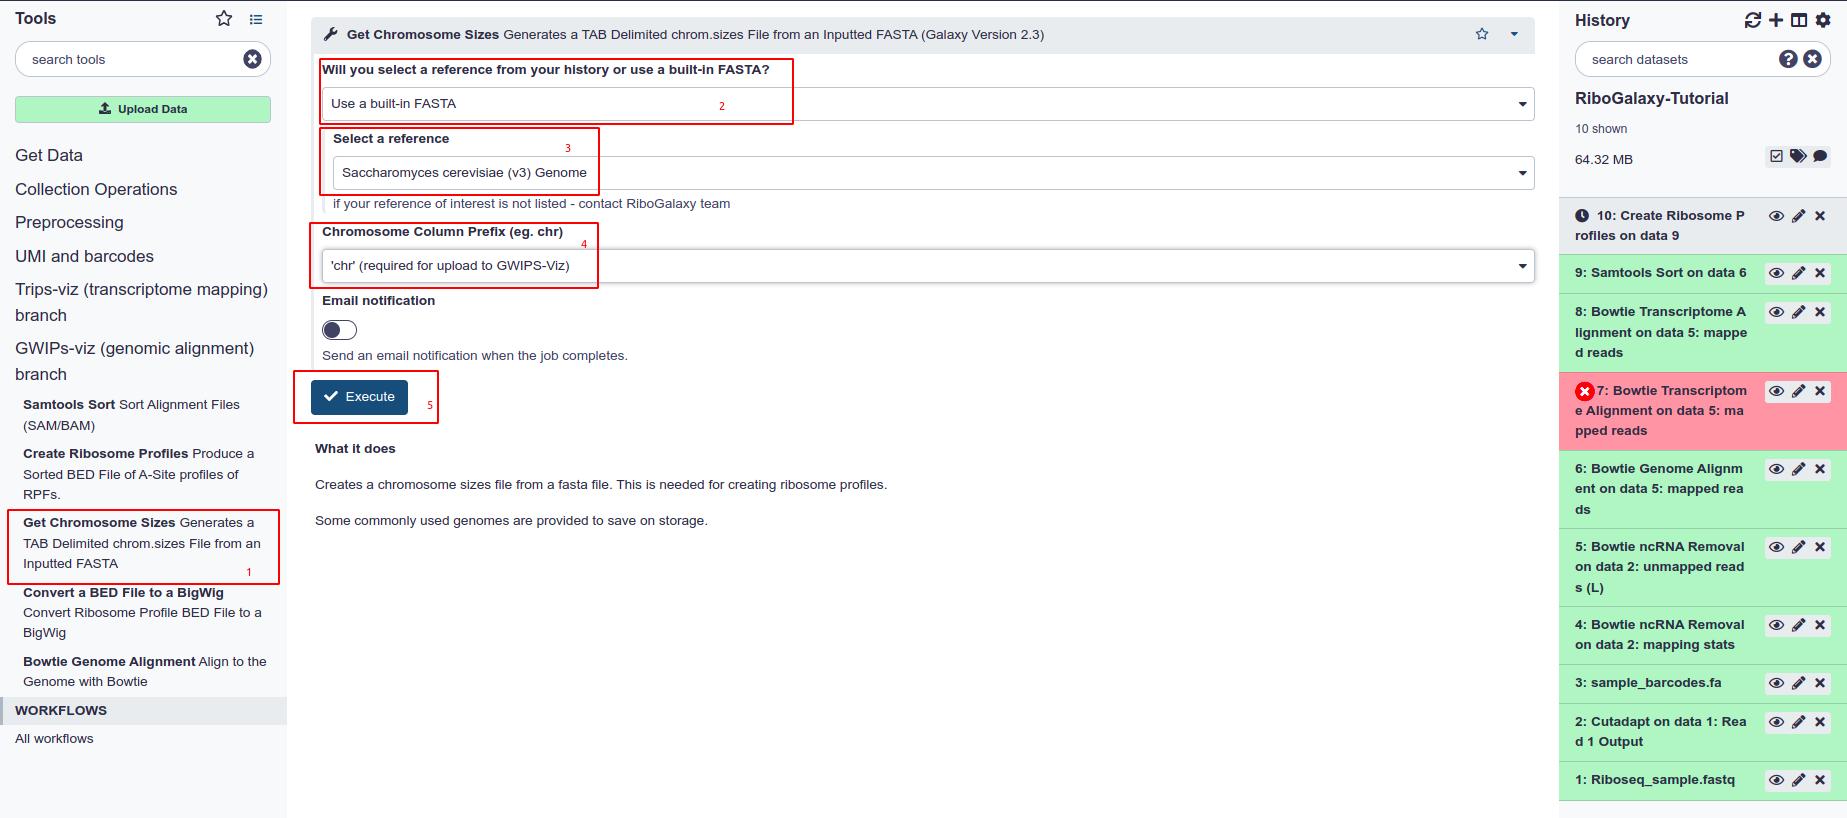
- Choose Get Chromosome Sizes from the tool panel.
- Select the FASTA input type that you are using. In this case we used a built-in index
- Choose the built-in index or FASTA file from the dropdown list.
- It is a requirement of GWIPS-Viz and UCSC genome broswer that all bed files have a ‘chr’ prefix in the chromosome column. Select this from the dropdown menu under ‘Chromosome Column Prefix’.
- Hit Execute
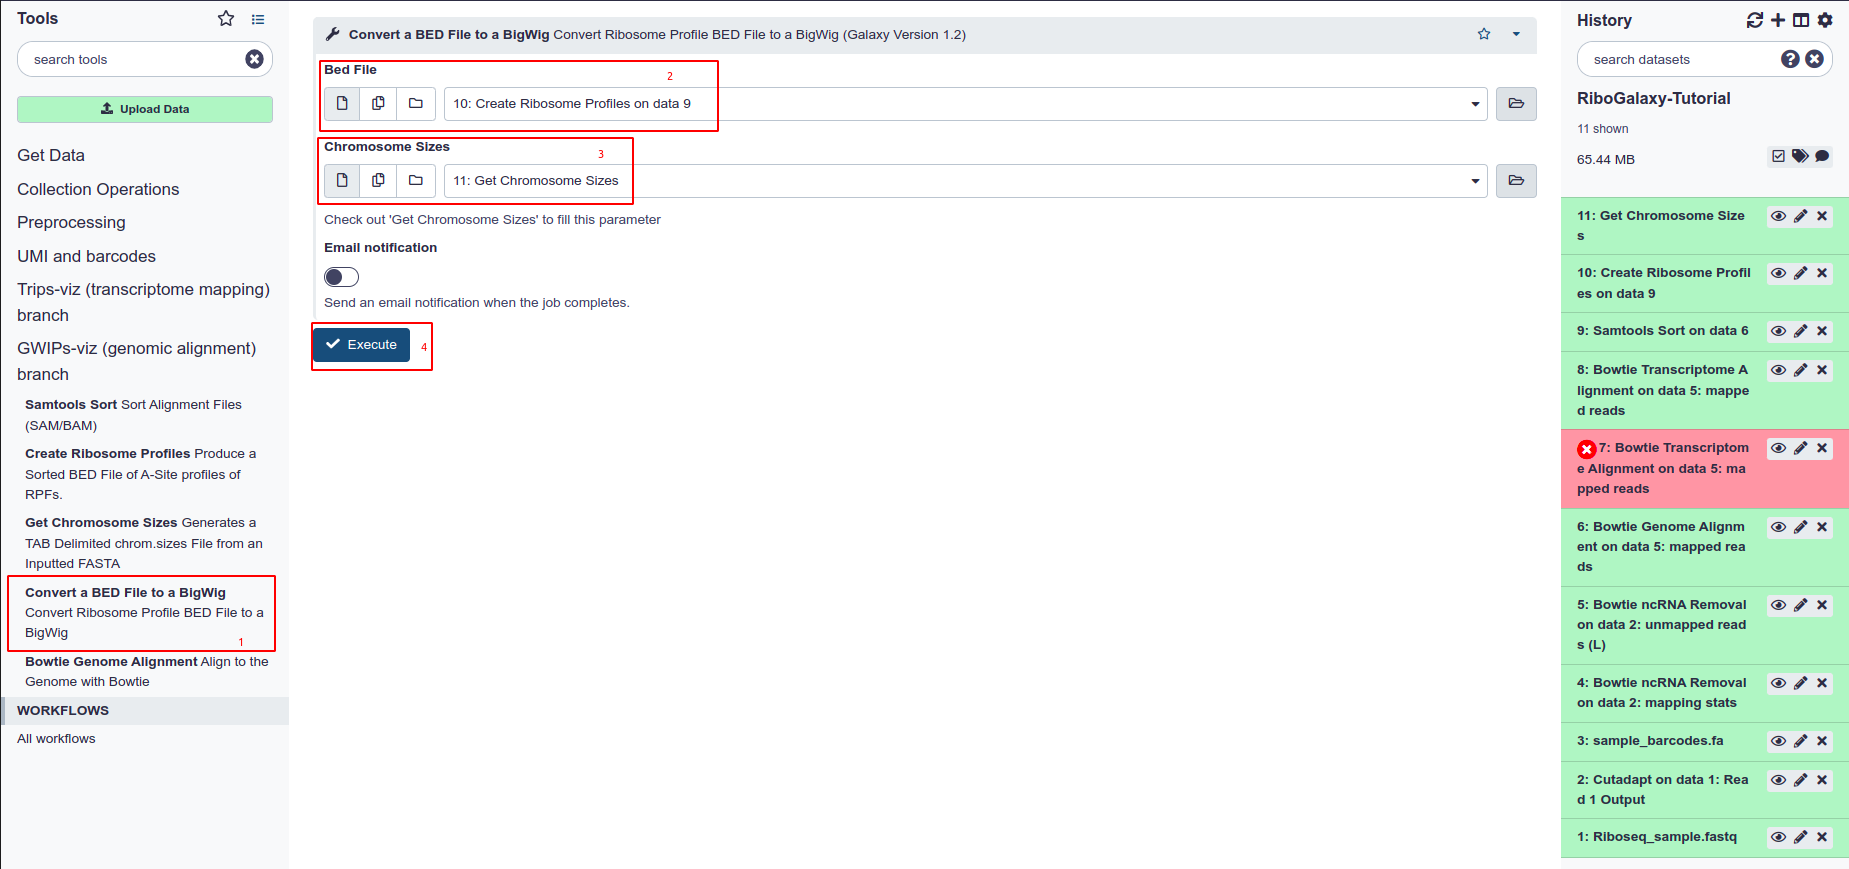
- Select Convert a BED file to a BigWig from the tools panel
- Select your BED file from the drop down menu
- Select your chromosome sizes file from the dropdown menu under Chromosome Sizes
- Hit Execute.
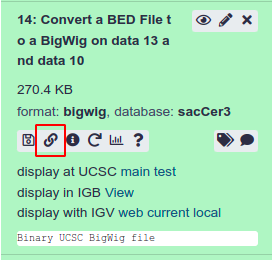
By copying the link using the button shown above on the tool panel we can load this data as a custom track on GWIPS-Viz
Trips-Viz
In order to visualise and analyse ribosome profiling data on Trips-Viz we must convert the BAM file produced in the Transcriptome Alignment step to a custom SQLITE dictionary. This is essentially a database of transcriptome alignments that we use to reduce processing time when a user renders a plot on Trips-Viz.
To create this sqlite file we must run the following steps.
Sort the BAM file
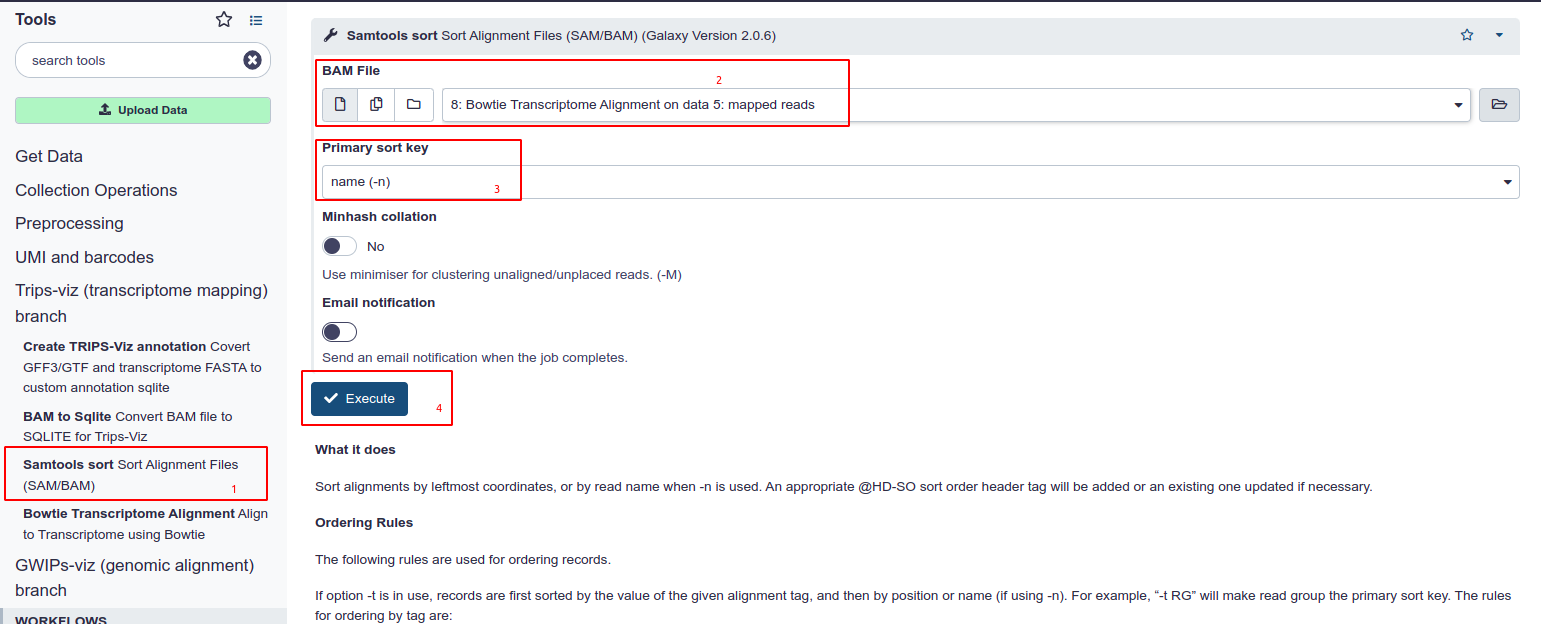
- Choose Samtools Sort from the tool panel in the section under Trips-Viz.
- Select the Transcriptome aligned BAM file from your history.
- Ensure ‘Name’ is selected as the primary sort key. This is set as default and is the primary differentiator between this tool and the one under the GWIPS-Viz section
- Hit Execute
Get an Organism Reference
We can either Download an Organism Reference from Trips-Viz or, if Trips does not support our organism, we can create and uplaod our own reference file.
Download
It is preferable to download the reference from Trips-Viz itself to avoid having to upload your own reference. Proceed to Trips-Viz/downloads and download the .sqlite file.

Create your Own
This option is more awkward as it involves fetching the corresponding GTF/GFF3 annotation file for your transcriptome. Typically we try to use the annotations from Gencode or Ensembl as other formattings can lead to errors.
- Transcriptome Name: This is a name (without spaces) for the reference transcriptome
- Transcriptome GFF3/GTF and Transcriptome FASTA must match.
- Psuedo UTR length: This is used in cases where references just contain the CDS. Otherwise just use 0
- Transcript ID: Usually this begins ENST… Look in the GTF file to find an example
- Gene Name: This can also be found in the GTF file normally with the prefix ‘Name’
Convert the BAM file to SQLITE

- Choose BAM to Sqlite from the tool Panel under Trips-Viz section
- Under Sorted (-n) BAM file, choose the name sorted file ensuring that it was aligned to the correct transcriptome
- Under Path to Organism Sqlite choose either the created or Uploaded annotation file from Trips
- Give the file a description regarding the sample conditions
- Hit Execute
Upload to Trips
Firstly we must download the processed file from RiboGalaxy.
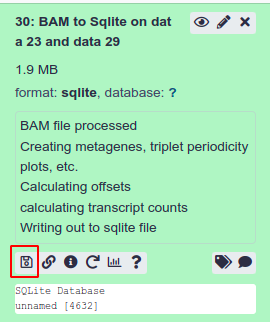

- Go to Trips upload page
- Choose ‘Upload a File’
- Fill in the information choosing the downloaded file from your local computer.
- Hit upload.
For more help with using Trips-Viz Check out our documentation.